How to take a dental impression at home without messing it up
Pick the tray that seats every tooth with a little room, load the putty in one steady sweep, and hold still for the full set time. Those three things decide whether the impression is usable, more than anything else in the kit.
Everything below is what actually breaks an impression, and how to avoid it the first time.
Start with the right tray
 PrepareRinse your mouth and lay out the trays, the putty tubs and a timer.
 Try every tray drySeat each size before you mix anything. It costs a minute and saves a remake.
 Judge the fitToo small leaves teeth outside. Too large lets the putty slide. The right one covers every tooth with a little room.
Mixing the putty
The two parts are colour coded so you can see when they are fully blended. Knead until the colour is even, usually 30 to 45 seconds, then move fast. The clock is already running once the colours meet.
Loading and seating the tray
Fill the tray slightly overfull rather than level. Putty that is short of the tray edge is the single most common reason a tooth comes out missing from the impression.
For the upper arch, tilt your head slightly forward and press the tray up and back. For the lower, tilt back and press up. Either way, seat it in one motion rather than several small pushes, which is what traps bubbles.
Holding it still
Bite down with even pressure and stay still for the full set time on your instructions, usually 2 to 3 minutes. Talking, swallowing hard or shifting your jaw during that window is what causes the doubled, blurred edges that fail review.
What ruins an impression, and the fix
| What went wrong | What it looks like | The fix |
|---|---|---|
| Moved during the set | Doubled or blurred edges | Hold still, do not talk or swallow for the full time |
| Not enough putty | Thin spots or a tooth missing outline | Overfill the tray before seating it |
| Bubbles trapped | Small holes in the surface | Load putty from one edge in a steady sweep |
| Pulled out too soon | Soft, tacky surface | Wait for the full set time on the instructions |
Any of these is a free remake, not a charge.
What happens after you mail it back
- The impression kit reaches you by USPS in 3 days or FedEx overnight.
- You take the impressions at home and mail them back with the prepaid label.
- A technician checks for clear tooth outlines and no bubbles before anything is built.
- A failed impression gets a fresh kit at no charge, no explanation needed.
Anything painful, bleeding, or an extraction site that has not closed yet needs a dentist before you take an impression, not after.
Questions people actually ask
What if I mess up my impression
You get a free replacement kit. A blurred or bubbled impression is caught before anything is built, not after.
How long does the putty take to set
Two to three minutes once you bite down, though your kit instructions are the exact number for the putty you were sent.
Can I use one kit for more than one appliance
No, each order ships its own kit sized to that appliance. A second appliance needs a second kit.
Do I need to see a dentist before taking impressions
Only if the area is painful, bleeding or an extraction site is still healing. Otherwise the kit is designed to be used at home without a visit.
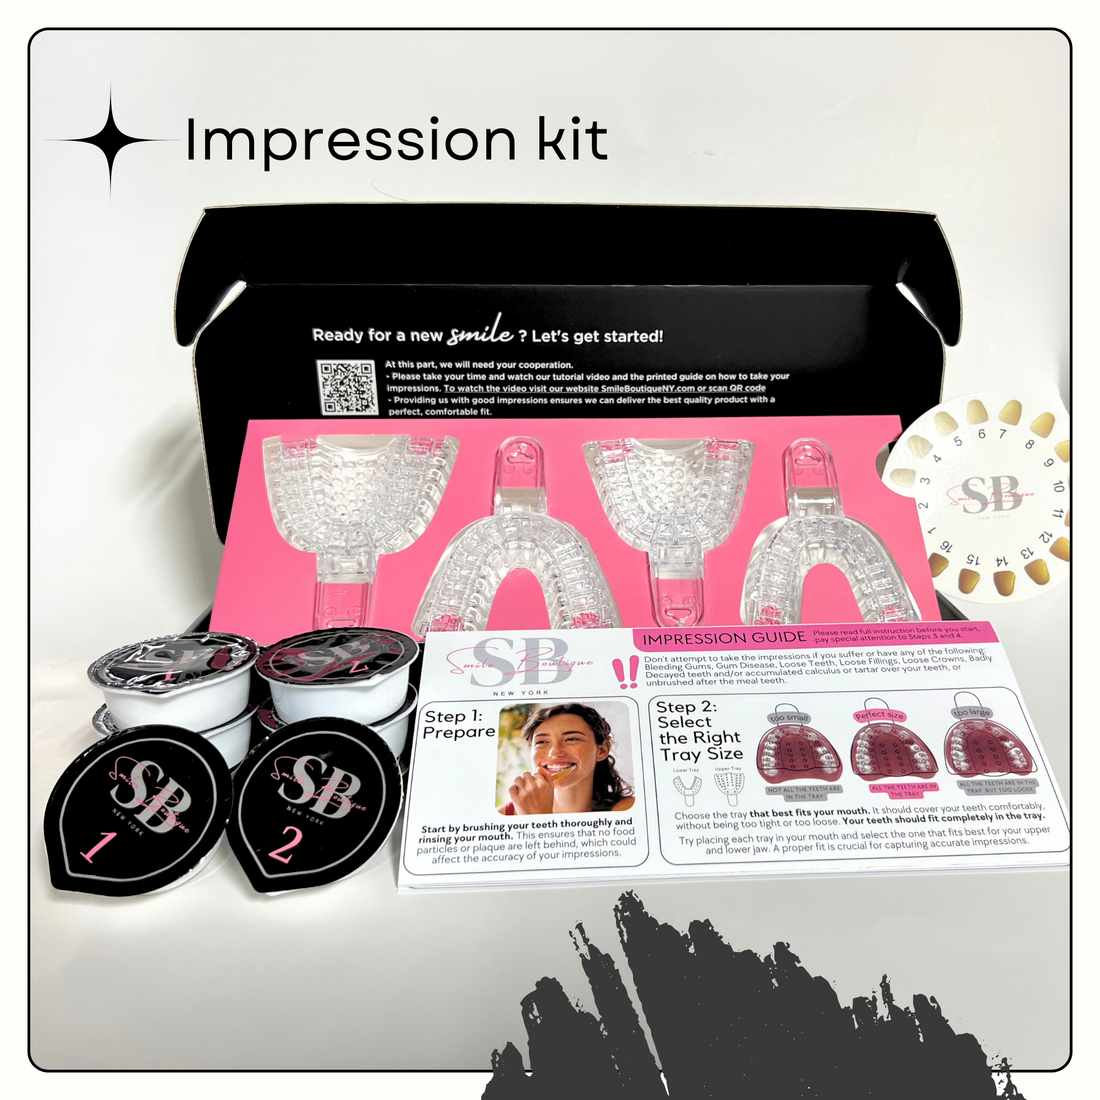
What comes in the impression kit
Trays sized to your arch, putty in two parts, a shade guide, printed and video instructions, and a prepaid return label.
Ready to see what the impressions turn into, read the Essix retainer and flipper comparison or check every Smile Lab USA price in one list.